Welcome to Css!
CSS is a language that describes the style of an HTML document.
CSS describes how HTML elements should be displayed.
This tutorial will teach you CSS from basic to advanced.
CSS : Cascading Style Sheet.
- HTML was NEVER intended to contain tags for formatting a web page!
- HTML was created to describe the content of a web page, like:
- < h1 >This is a heading< /h1 >
- < p >This is a paragraph.< /p > When tags like < font >, and color attributes were added to the HTML 3.2 specification, it started a nightmare for web developers. Development of large websites, where fonts and color information were added to every single page, became a long and expensive process.
- To solve this problem, the World Wide Web Consortium (W3C) created CSS.
- CSS removed the style formatting from the HTML page!
CSS Solved a Big Problem
- It adds some more style to a html page
- We can define differnt styles by appling id (#) or type(.) or class(.) or direct declaring the tag.
- A CSS rule-set consists of a selector and a declaration block:
CSS selector The selector points to the HTML element you want to style. The declaration block contains one or more declarations separated by semicolons. Each declaration includes a CSS property name and a value, separated by a colon. Multiple CSS declarations are separated with semicolons, and declaration blocks are surrounded by curly braces.
-
h1(selector) :{color(proparty): blue(value)}
CSS Syntax
- p is a selector in CSS (it points to the HTML element you want to style: <p >)
- color is a property, and red is the property value
- text-align is a property, and center is the property valuev
Example Explained
- background-color
- background-image
- background-repeat
- background-attachment
- background-position
The CSS background properties are used to define the background effects for elements.
In these chapters, you will learn about the following CSS background properties:Colors &Backgroung to Css!
- The background-color property specifies the background color of an element.
CSS background-color :
The background color of a page is set like this:
-
With CSS, a color is most often specified by:
- a valid color name - like "cyan"
- a HEX value - like "#ff0600"
- an RGB value - like "rgb(245,0,0)"
Transparency using RGBA
If you do not want to apply opacity to child elements, like in our example above, use RGBA color values. The following example sets the opacity for the background color and not the text:
- You learned from our CSS Colors Chapter, that you can use RGB as a color value. In addition to RGB, you can use an RGB color value with an alpha channel (RGBA) - which specifies the opacity for a color.
- An RGBA color value is specified with: rgba(red, green, blue, alpha). The alpha parameter is a number between 0.0 (fully transparent) and 1.0 (fully opaque).
Transparency using RGBA
- The background-image property specifies an image to use as the background of an element.
- By default, the image is repeated so it covers the entire element.
CSS background-image
- The background image for a page can be set like this:
CSS background - Shorthand property
To shorten the code, it is also possible to specify all the background properties in one single property. This is called a shorthand property.
Instead of writing:How To Add Icons and Navs Using Bootstarp:
The simplest way to add an icon to your HTML page, is with an icon library, such as Font Awesome. Add the name of the specified icon class to any inline HTML element (like <i> or <span>). All the icons in the icon libraries below, are scalable vectors that can be customized with CSS (size, color, shadow, etc.)
-
cloud
favorite
attachment
computer
traffic
-
We can use differt type of icons using Bootstrap The icons are known as Glyphicons :
- the way to use Glyphicons : within your code is :
The Bootstrap glyphicons :-> add the following line inside the < head > section of your HTML page:
<link rel="stylesheet" href=https://maxcdn.bootstrapcdn.com/bootstrap/3.3.7/css/bootstrap.min.css">
-
Font Awesome Icons:
To use the Font Awesome icons, go to fontawesome.com, sign in, and get a code to add in the section of your HTML page: < script src="https://kit.fontawesome.com/yourcode.js></script > Read more about how to get started with Font Awesome in our Font Awesome 5 tutorial. Note: No downloading or installation is required!
We can use some more attractive Icon packs by using Font Awasome Icons
Navigation Bars:
Having easy-to-use navigation is important for any web site. With CSS you can transform boring HTML menus into good-looking navigation bars. Navigation Bars A navigation bar needs standard HTML as a base. In our examples we will build the navigation bar from a standard HTML list. A navigation bar is basically a list of links, so using the < ul > and < li > elements makes perfect sense:- Navigation Bars Having easy-to-use navigation is important for any web site. With CSS you can transform boring HTML menus into good-looking navigation bars.
- Horizental Nav
- Vertivcal Nav
There are two types of nav designs
2.
Such As:
- We can use @keyframe keyword for animation
- The aniamtion is used to add animation to any page
- We also use transmition to add running animation. @keyframes
Construction of Animation
We can also construct Animation using C.S.S
animation-name
animation-duration
animation-delay
animation-iteration-count
animation-direction
animation-timing-function
animation-fill-mode
animationv
CSS Transitions:
CSS transitions allows you to change property values smoothly, over a given duration.
How to Use CSS Transitions?
To create a transition effect, you must specify two things: the CSS property you want to add an effect to the duration of the effect Note: If the duration part is not specified, the transition will have no effect, because the default value is 0. The following example shows a 100px * 100px red < div > element. The <div > element has also specified a transition effect for the width property, with a duration of 2 seconds:
The transition effect will start when the specified CSS property (width) changes value. Now, let us specify a new value for the width property when a user mouses over the < div > element:
Change Several Property Values
The following example adds a transition effect for both the width and height property, with a duration of 2 seconds for the width and 4 seconds for the height:
How To Create a Glowing Text:
Use the text-shadow property to create the neon light effect, and then use animation together with keyframes to add the repeatedly glowing effect:
Bunker
Welcome To Html!
HTML is the standard markup language for Web pages.
HTML is easy to learn - You will enjoy it!
-
What is HTML?
- HTML stands for Hyper Text Markup Language
- HTML describes the structure of a Web page
- HTML consists of a series of elements
- HTML elements tell the browser how to display the content
- HTML elements are represented by tags
- HTML tags label pieces of content such as "heading", "paragraph", "table", and so on
- Browsers do not display the HTML tags, but use them to render the content of the page
- But how to code in Html
We need some editor to code ... So here we provide some link ..
- NotePad is the basic choice but now a days people use other editors
- Sublime text 3 this is the most used editor Click here
- DreamWeaver this is another editor Click here
- Visual Studio Code this is another editor Click here
-
Complete download now what to do...........
get stuck Don't worry just follow the below process for any type of editor... I am using Sublime Text 3
- At first open any editor
- Then click on New to create new file
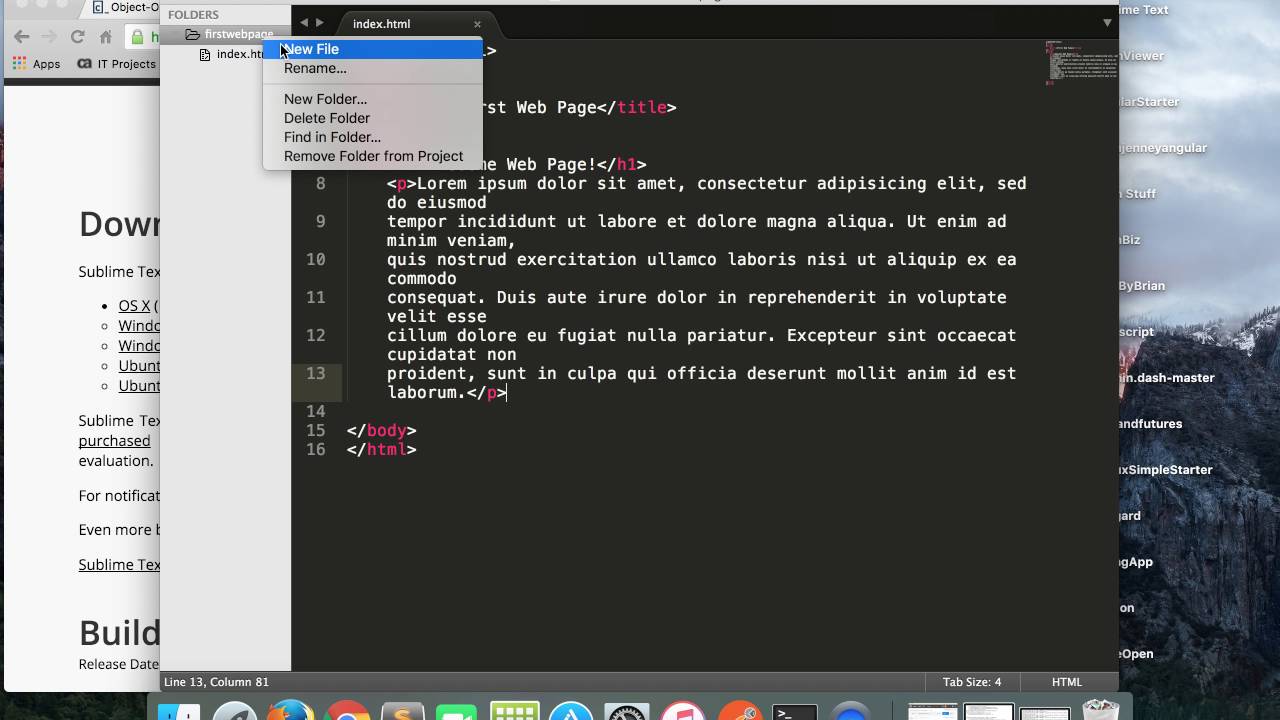
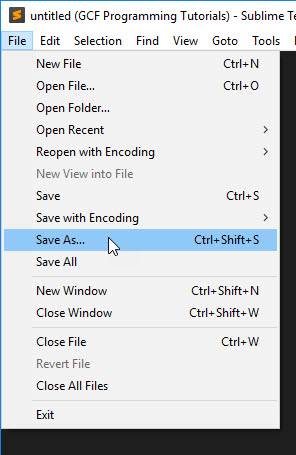
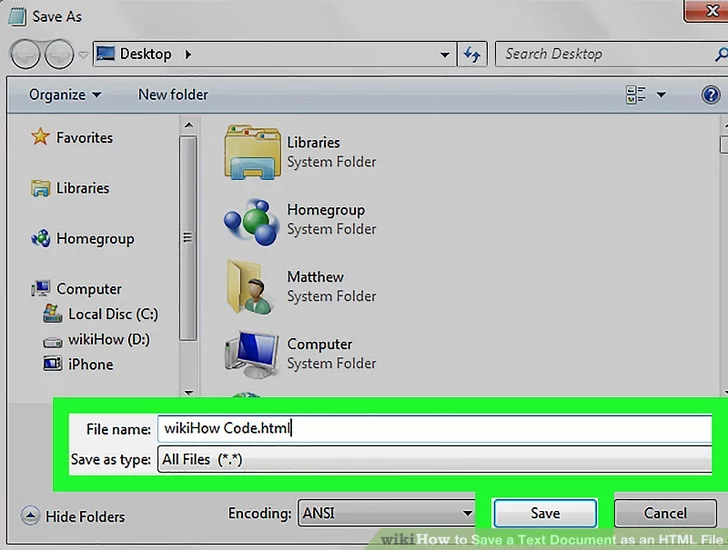
- Set title and then click to save as
- After creating the html file save it with ".html" extention name..
- You are ready to go....Start coding.... Follow the process shown below .
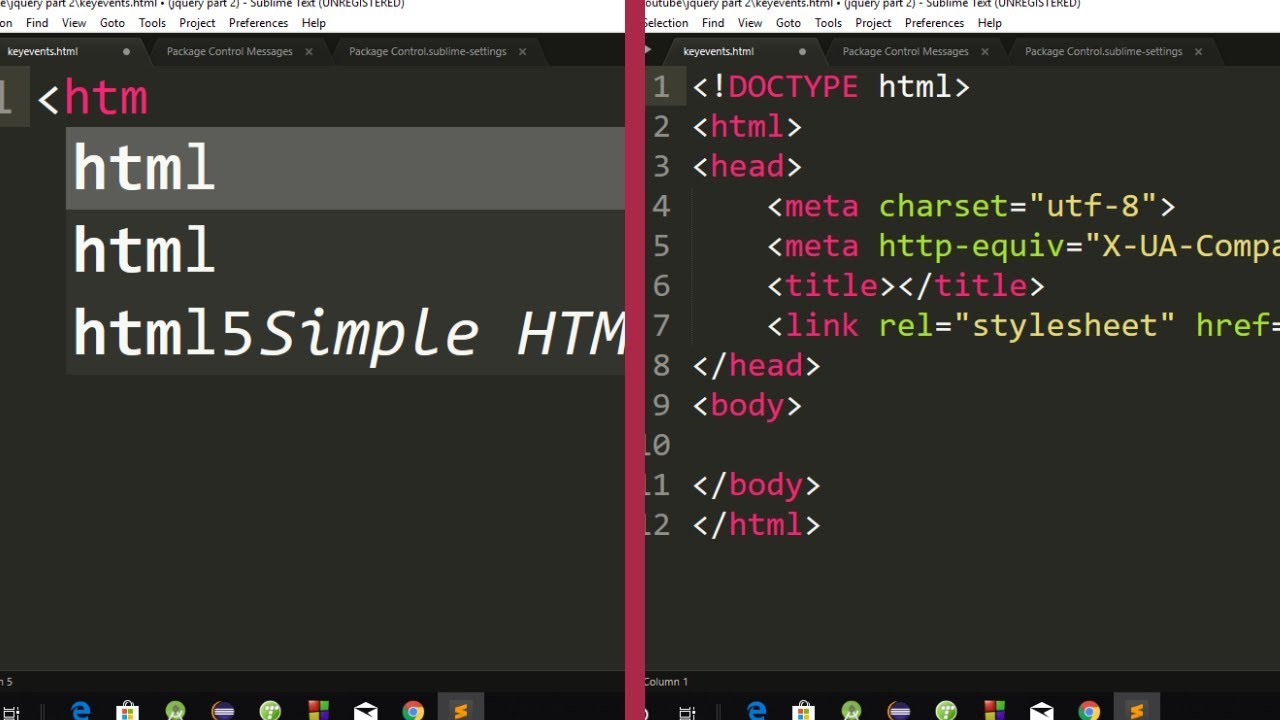
- Enter CTRL+S to save the file and open it to browser
-
Example Explained
- The< ! doctype html > declaration defines this document to be HTML5
- The < html > element is the root element of an HTML page
- The < head > element contains meta information about the document
- The < title > element specifies a title for the document
- The < body > element contains the visible page content
- The < header > element defines a header
- The < footer > element defines a footer
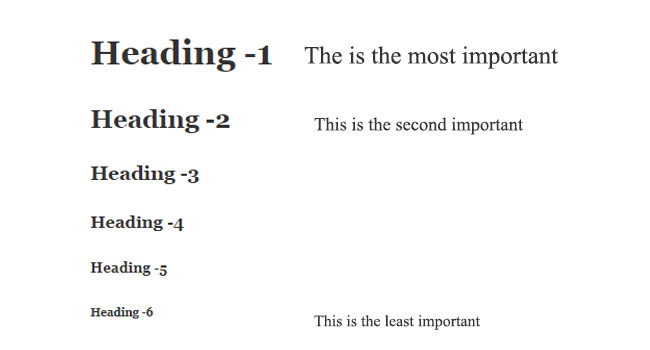
- The < h1 > element defines most large heading
- The < h2 > < h3> < h4> < h5> < h6> element defines bold heading this headings are used to give headings of differnt size.
- The & nbsp ; element defines a space between two word
- The < p > element defines a paragraph
- The < b > element defines a bold word or sentence
- The < u > element defines a Underline
- The < br > element defines a line-break
Attributes in Html!
- HTML Attributes
- All HTML elements can have attributes
- Attributes provide additional information about an element
- Attributes are always specified in the start tag
- Attributes usually come in name/value pairs like: name="value"
-
The width and height Attributes
HTML images also have width and height attributes, which specifies the width and height of the image:
- The tag be like:
<img src="img.jpg" width="500" height="600"> - where img src tag used to select any random image from the folder
- height & width are used to set the height and width of any image.
- The style attribute is used to specify the styling of an element, like color, font, size etc.
- this <style> attribute is used to apply any particular proparty to any tag
- the < p> tag is used to create a paragraph .
The style Attribute
- The language is declared with the lang attribute.
- Declaring a language is important for accessibility applications (screen readers) and search engines:
-
<!DOCTYPE html> <html lang="en-US"> <body> ... </body> </html>
The <lang> Attribute
The language of the document can be declared in the <html> tag.The <title> Attribute
Here, a title attribute is added to the <p> element. The value of the title attribute will be displayed as a tooltip when you mouse over the paragraph:- this attribute is used to link to web pages The HTML standard does not require quotes around attribute values. The href attribute can be written without quotes:
Wrong process
Right process
The < a > Attribute
-
Attribute Description
- alt : : Specifies an alternative text for an image, when the image cannot be displayed
- disabled : : Specifies that an input element should be disabled
- href : : Specifies the URL (web address) for a link
- id : : Specifies a unique id for an element
- src : : Specifies the URL (web address) for an image
- style : : Specifies an inline CSS style for an element
- title : : Specifies extra information about an element (displayed as a tool tip)
Color & id in Html!
- In HTML, a color can be specified by using a color name:
Color Names
Tomato
Orange
DodgerBlue
MediumSeaGreen
Gray
SlateBlue
Violet
LightGray
Cyan
Crimson
- You can set the background color for HTML elements by using < style > and background-color:
Background Color
- This proparty is used to color up the border of any box
-
Hi! folks
Let's Have
Some fun
the < font > tag is used to set differnt proparty to any text
- color : to set color to any text
- face :to set any font style to text
- size : to set font size to a text
Border Color
- rgb(255,99,71) where rgb stands for red , green, blue.
- #ffffff where # code is used to declare color
- hsla, rgba, hsl this are also process
There are different type of color codes present in HTML
To check Differnt Type Of gradient Click here
Graphics in Html!
What is HTML Canvas?
- The HTML < canvas > element is used to draw graphics, on the fly, via JavaScript.
- The < canvas > element is only a container for graphics. You must use JavaScript to actually draw the graphics.
- Canvas has several methods for drawing paths, boxes, circles, text, and adding images. Canvas Examples
- A canvas is a rectangular area on an HTML page. By default, a canvas has no border and no content.
- The markup looks like this:
- Output :
Note: Always specify an id attribute (to be referred to in a script), and a width and height attribute to define the size of the canvas. To add a border, use the style attribute.
Here is an example of a basic, empty canvas:- SVG stands for Scalable Vector Graphics
- SVG is used to define graphics for the Web
- SVG is a W3C recommendation
- The HTML <svg> Element
- The HTML <svg> element is a container for SVG graphics.
- SVG has several methods for drawing paths, boxes, circles, text, and graphic images.
What is SVG?
SVG Circle :
SVG Rounded Rectangle:
SVG Star:
- SVG is a language for describing 2D graphics in XML.
- SVG is XML based, which means that every element is available within the SVG DOM. You can attach JavaScript event handlers for an element.
- In SVG, each drawn shape is remembered as an object. If attributes of an SVG object are changed, the browser can automatically re-render the shape.
- Canvas draws 2D graphics, on the fly (with a JavaScript).
- Canvas is rendered pixel by pixel. In canvas, once the graphic is drawn, it is forgotten by the browser
- If its position should be changed, the entire scene needs to be redrawn, including any objects that might have been covered by the graphic.
SVG Logo:
Differences Between SVG and Canvas
- Svg
- Canvas
Welcome to C Programming Learning !
To install the Turbo C software, you need to follow following steps.
- Download Turbo C++.
- Create turboc directory inside c drive and extract the tc3.zip inside c:\turboc.
- Double click on install.exe file.
- Click on the tc application file located inside c:\TC\BIN to write the c program.
Some facts about C Programming.
- In 1988, the American National Standards Institute (ANSI) had formalized the C language.
- C was invented to write UNIX operating system.
- C is a successor of 'Basic Combined Programming Language' (BCPL) called B language.
- Linux OS, PHP, and MySQL are written in C.
- C has been written in assembly language.
Uses of C Programming language.
- Database Systems
- Language Interpreters
- Compilers and Assemblers
- Operating Systems
- Network Drivers
- Word Processors
In the beginning, C was used for developing system applications, e.g. :
Features of C Programming language.
C has become very popular for various reason....
Advantages of C Programming Language
Disadvantages of C Programming Language
What is C compiler?
A compiler is a computer program that transforms human-readable (programming language) source code into another computer language (binary) code. In simple terms, Compiler takes the code that you wrote and turned in to the binary code that the computer can understand. The C compiler is a software application that transforms the human-readable C program code to machine-readable code. The process of transforming the code from High-Level Language to Machine Level Language is called "Compilation". The human-readable code is the C program that consists of digits letters, special symbols, etc. which is understood by human beings. On the other hand, machine language is dependent on the processor and processor understands zeroes and ones (binary) only. All C program execution is based on a processor which is available in the CPU; that is why entire C source code needs to be converted to the binary system by the compiler. This tutorial is written for Windows, Unix / Linux, and MAC users. All code has been tested, and it works correctly on all three operating systems.C Language Fundamental:-
Example:
int amount;double totalbalance;
In the above example, amount and totalbalance are identifiers and int, and double are keywords.
- An identifier can only have alphanumeric characters (a-z , A-Z , 0-9) (i.e. letters & digits) and underscore( _ ) symbol.
- Identifier names must be unique.
- The first character must be an alphabet or underscore.
- You cannot use a keyword as identifiers.
- Only the first thirty-one (31) characters are significant.
- It must not contain white spaces.
- Identifiers are case-sensitive.
C Keyword List:-
| auto | double | int | struct |
| break | else | long | switch |
| case | enum | register | typedef |
| char | extern | return | union |
| const | float | short | unsigned |
| continue | for | signed | void |
| default | goto | sizeof | volatile |
| do | if | static | while |
Example where and how keywords are used in the program.
Example:
Welcome to Python Learning !
How to Get Started With Python?
In this tutorial, you will learn to install and run Python on your computer. Once we do that, we will also write our first Python program.Python is a cross-platform programming language, which means that it can run on multiple platforms like Windows, macOS, Linux, and has even been ported to the Java and .NET virtual machines. It is free and open-source. Even though most of today's Linux and Mac have Python pre-installed in it, the version might be out-of-date. So, it is always a good idea to install the most current version.
What is Polymorphism?
The literal meaning of polymorphism is the condition of occurrence in different forms. Polymorphism is a very important concept in programming. It refers to the use of a single type entity (method, operator or object) to represent different types in different scenarios. Let's take an example:
Example 1: Polymorphism in addition operator
We know that the + operator is used extensively in Python programs. But, it does not have a single usage. For integer data types, + operator is used to perform arithmetic addition operation.- Addition of two no:
-
What is Python?
Python is a popular programming language. It was created by Guido van Rossum, and released in 1991. It is used for: web development (server-side), software development, mathematics, system scripting.
What can Python do?
- Python can be used on a server to create web applications.
- Python can be used alongside software to create workflows.
- Python can connect to database systems. It can also read and modify files.
- Python can be used to handle big data and perform complex mathematics.
- Python can be used for rapid prototyping, or for production-ready software development.
Why Python?
- Python works on different platforms (Windows, Mac, Linux, Raspberry Pi, etc).
- Python has a simple syntax similar to the English language.
- Python has syntax that allows developers to write programs with fewer lines than some other programming languages.
- Python runs on an interpreter system, meaning that code can be executed as soon as it is written. This means that prototyping can be very quick.
- Python can be treated in a procedural way, an object-orientated way or a functional way.
Good to know
- The most recent major version of Python is Python 3, which we shall be using in this tutorial. However, Python 2, although not being updated with anything other than security updates, is still quite popular.
- In this tutorial Python will be written in a text editor. It is possible to write Python in an Integrated Development Environment, such as Thonny, Pycharm, Netbeans or Eclipse which are particularly useful when managing larger collections of Python files.
- Python Syntax compared to other programming languages Python was designed for readability, and has some similarities to the English language with influence from mathematics.
- Python uses new lines to complete a command, as opposed to other programming languages which often use semicolons or parentheses.
- Python relies on indentation, using whitespace, to define scope; such as the scope of loops, functions and classes. Other programming languages often use curly-brackets for this purpose.
Python Install
Many PCs and Macs will have python already installed. To check if you have python installed on a Windows PC, search in the start bar for Python or run the following on the Command Line (cmd.exe):
C:\Users\Your Name>python --version
If you find that you do not have python installed on your computer, then you can download it for free from the following website: https://www.python.org/
Python Quickstart
Python is an interpreted programming language, this means that as a developer you write Python (.py) files in a text editor and then put those files into the python interpreter to be executed. The way to run a python file is like this on the command line:
C:\Users\Your Name>python helloworld.py Python First Program
Welcome
Python Indentation :
Indentation refers to the spaces at the beginning of a code line. Where in other programming languages the indentation in code is for readability only, the indentation in Python is very important. Python uses indentation to indicate a block of code.Condition CheckingsComments
Python has commenting capability for the purpose of in-code documentation. Comments start with a #, and Python will render the rest of the line as a comment:
Example Comments in Python: we can use (#) for comment any line we can use /* */ for comment any particular paragraphPython Variable
Creating Variables
Variables are containers for storing data values. Unlike other programming languages, Python has no command for declaring a variable. A variable is created the moment you first assign a value to it.VariableBuilt-in Data Types
In programming, data type is an important concept. Variables can store data of different types, and different types can do different things. Python has the following data types built-in by default, in these categories:
Text Type : str
Numeric Types : int, float, complex
Sequence Types : list, tuple, range
Mapping Type : dict
Set Types : set, frozenset
Boolean Type : bool
Binary Types : bytes, bytearray, memoryviewv
Getting the Data Type
You can get the data type of any object by using the type()function:
Example
Print the data type of the variable x:
Variable
Setting the Data Type
In Python, the data type is set when you assign a value to a variable:
x = "Hello World" : str
x = 20 : int
x = 20.5 : float
x = 1j : complex
x = ["apple", "banana", "cherry"] : list
x = ("apple", "banana", "cherry") : tuple
x = range(6): range
x = {"name" : "John", "age" : 36} : dict
x = {"apple", "banana", "cherry"} : set
x = frozenset({"apple", "banana", "cherry"}) : frozenset
x = True : bool
x = b"Hello" : bytes
x = bytearray(5) : bytearray
x = memoryview(bytes(5)) : memoryview
Python Numbers
There are three numeric types in Python:
int
float
complex
Variables of numeric types are created when you assign a value to them:
Example:
Variable Types
Specify a Variable Type
There may be times when you want to specify a type on to a variable. This can be done with casting. Python is an object-orientated language, and as such it uses classes to define data types, including its primitive types.
Casting in python is therefore done using constructor functions:
- int() - constructs an integer number from an integer literal, a float literal (by rounding down to the previous whole number), or a string literal (providing the string represents a whole number)
- float() - constructs a float number from an integer literal, a float literal or a string literal (providing the string represents a float or an integer)
- str() - constructs a string from a wide variety of data types, including strings, integer literals and float literals
Casting